Thursday, March 31, 2011

Pazzles Easter bunny baskets

Easter bunny baskets made on the Pazzles! Yahoo, I'm so excited. I have had this inspiration piece cut out of a catalog for a couple of years. I have wanted to copy their felt bags into paper. I have finally done it! (Mwaahhaaahhaa, did anyone else here that last sentence in a diabolical Dr. Frankenstein voice, like I did? No? Ok, ignore me then.)

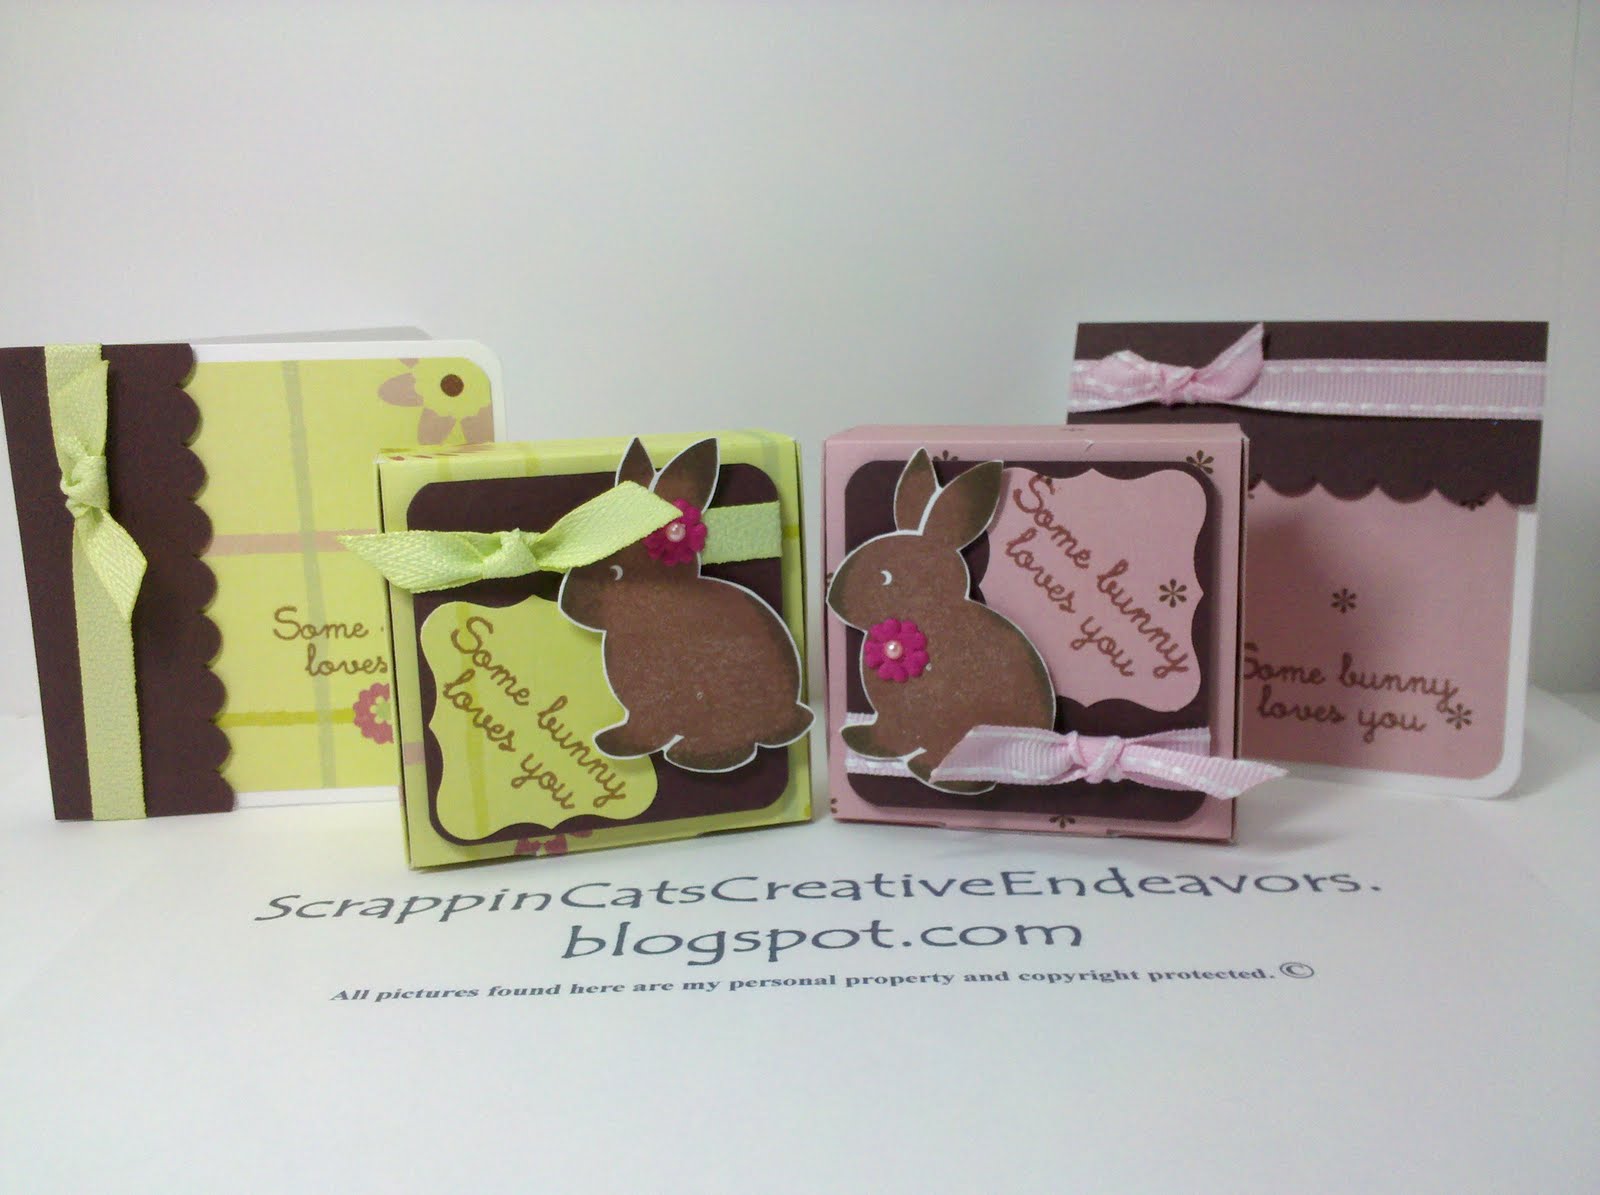
Isn't he sweet? The face is pretty much copied exactly, the ears are a bit different but similar still. His finished size is a 3 inch square, so he will hold plenty of chocolate treats.

I used DCWV paper from a spring stack that is a couple of years old now. It's perfect single sided heavy weight paper for this project. Then I used scraps for the ears, eyes and nose. The handle is 12 x .75 strip cut from the scrap left after cutting the bunny parts. Oh, and I just thought of it, but haven't added it yet. A white puff ball glued to his little back side. The piece de resistance! I plan on making more of these. I must have one for every place setting at my Easter dinner table. Goody, the girl bunnies I will get to dress up with ribbon and flowers and pearls and maybe a fancy edge to the brim of their little hats. (That's what I assume the folded down striped parts are supposed to represent. A nice Easter hat. Boy or girl, right?)

I am happy to share my Pazzles .wpc file. Leave me a comment on this post, please include your email so its quick and easy for me to send the file out to you.

Find inspiration everywhere! Go... Create something fun & fabulous. Enjoy!

SU! card class cards

My friend, paper crafts mentor and super SU! demonstrator Tina aka thecrazystamplady.blogspot.com designed these cards, cut all the pieces and embossed all the pieces for a card class she gave last Friday. I could not attend the class, so sweetheart that she is, she stamped my pieces and brought me the two kits. Thanks Tina! I love them, and am always amazed by your creativity and imagination. Thanks for more then a decade of inspiration, you're awesome!

This is called a never-ending card. I have seen several ideas, even attempted one but had not successfully completed one yet. I love this one. It is perfect for a male or female birthday, which in itself makes it a treasure. So check out each of the sides you see as you fold away.

Here is inside number 1,

and inside number 2,

and this is the back side, also the area you can sign and personalize. Don't you just love it? I do. Awesome design Tina, I'm so thankful you shared your kit with me. I really enjoyed putting together both cards.

So, being me, I did personalize it a bit. I rounded the upper corners on the cake tray and then inked the edges of the cake tray. I also used cinnamon stickles on the cupcake frosting sprinkle spots. For the never ending card I rounded all the corners of all the decorative layers and added some stickles and liquid pearls to inside page number 1, on the candle flame and the cherries on the cupcakes. Just a few little touches.


Find inspiration everywhere! Go... Create something fun & fabulous. Enjoy!

Sunday, March 27, 2011

Birthday list mini album

I made this little mini album as an event reminder calendar. It has 6 pages with staggered tabs so I could put the months on each tab, front and back. The completed size is 3.75 x 4.75 inches.  I used K & Co. Chocolate Neapolitan again. I just love the browns, pinks and greens lately.

I designed the covers and tabbed pages in the Cricut Design Studio using my trusty George cartridge.

It's hard to see but the spine is just card stock scored at every .5 inch and mountain/valley folded. Then the tabbed pages are taped to the front of each mountain fold. I found a great tutorial for this type of mini book binding here, at pinefeather.typepad.com.  This mini was a quick and simple solution for keeping a list of events for each month. But now I'm also thinking it would make a great grandma brag book. You could keep school photo's or snapshots from a single event on the pages. Hmmm....my head is swimming with possibilities again. So many ideas, so little time.

I created a word document with the months of the year and one with lines across the page so that I could print it out on coordinating cardstock.

If you would like the .cut file for the mini book, or the word doc for the tabs I am happy to share. Please leave a comment on this post including your email address. It makes my sharing so much easier if you include it right here rather than me having to track it down. Thanks for understanding.

Find inspiration everywhere! Go... Create something fun & fabulous. Enjoy!
 

Peek-a-boo box and matching cards


Chocolate Easter bunnies are here! Yahoo! So do you nibble on their little ears first or start on the tail? I'm an ear gal, I leave the bunny wrapped in the foil so I don't get my fingers chocolaty while I am scrapping. ;)
These are some adorable peek-a-boo boxes, I originally saw a tutorial for them here on Splitcoast stampers. Than someone on the Cricut messageboards made a .cut file, so that is what I used today.

The sentiment is from CTMH B1324 Bunny love stamp set, and it is stamped in Chocolate ink. The bunny is new, and adorable and I love her. She is from A1112 A hop stamp set. I inked her up in Chocolate ink also, but then I did the rock-n-roll technique around her edges in Cocoa ink.

When you lift the outer lid of the box, this is the peek-a-boo portion. I punched this SU! shape from the middle of the 2nd lid since for some reason the .cut file did not cut the scallop square that showed on the design studio software. I have no idea what went wrong, but this was a quick and easy fix.

Here is a detail shot showing the second lid pulled up slightly. The box measures 2.5 x 2.5 x.1 inch, so its perfect for Ghirardelli chocolate squares. But I think it would also be cute with Easter M&M's or Kisses too.

The paper I used is from K & Co. Chocolate Neapolitan paper pack, and it was double sided. This is the back side. Cute huh? So from one 12 x 12 sheet I made two boxes and two 3.25 x 3.25 cards. I love that!!

Here is a detail shot of this box. You can see the slit along the front fold of the box. That is where the tab at the top of the lid slides into to keep the whole thing closed securely. Really ingenious.

Find inspiration everywhere! Go... Create something fun & fabulous. Enjoy!

Thursday, March 24, 2011

Irresistibles card

I just got a big box of CTMH goodies! Yahoo! I love new toys. I was most excited to try out the Irresistibles Lots of dots alpha stickers (Z1261). They come on a sheet and are white. You can ink them, spray them and add color any old way you want. Then I used a paper towel to lightly buff the color off of the polka dot pattern. I think they are adorable, and now I can have alpha stickers in any color I need. And who doesn't love polka dots?

Here is a detail shot.

I also used a new sentiment stamp from CTMH D1454 Sensational season. I used CTMH inks in Bubblegum and Sweet leaf. The flowers are punched out of DCWV Mango Frost mat stack using SU! Boho flower punch. The pearls are by Queen and Co. from my last scrapbook expo haul.

Find inspiration everywhere! Go... Create something fun & fabulous. Enjoy!

Wednesday, March 23, 2011

Easter basket with paper flower embellishment

This is a repeat of my Easter basket I have already posted before, you check out the details here. But this time I was more interested in a place to display my new found addiction. Paper pom pom flowers. I lucked upon this super-dee-duper video on youtube by conniemac1211. So I instantly was going through all of my paper flowers to find just the right kind to try out this technique. I love the tiny flowers. I started with flowers that are less than 1 inch so the finished pom pom flowers are tiny but adorable! I did find some bigger ones, a little under 1.5 inches, so I made a few of those too.

These are the tiny finished flowers. Aren't they just the cutest? I love them, they go together so quickly and pack a huge punch of fun and cuteness.

This is the larger finished flower, I put it on the handle. Along with my CTMH cotton candy pom pom ribbon.

Here are a few more finished pom pom flowers. The red one is actually a silk flower. It turned out very cute also. I am so happy I found this new technique.

Find inspiration everywhere! Go... Create something fun & fabulous. Enjoy!
 

Tuesday, March 22, 2011

Pazzles Superman emblem card


I had this card idea in my head, specifically for a friend. I was telling my mom about it, and she was confident she could design a cut file for it for our Pazzles. She did it. It turned out better then I had hoped. I guess I do not remember my Superman comics or movies very well, I new he had blue, yellow and red in his costume. I have been told I didn't quite get it right. But I'm still thrilled with the completed card.

I stamped the sentiment on the inside with a CTMH alphabet set in Holiday red ink. The card has a built in gift flap, folded up inward and adhered to the card back with double sided tape pieces to create a pocket. This allowed us to insert the cash gift and have it be somewhat private. It's a 5 x 7 card, the gift pocket is 2 x 7. Since that was not quite deep enough to hide dollar bills, I extended it with the blue cardstock strip edged with a border punch. I have such a hard time keeping a card masculine. It's just so hard for me. I hope I succeeded with this.


Find inspiration everywhere! Go... Create something fun & fabulous. Enjoy!

Sunday, March 20, 2011

You are my sunshine card & a sneak peek

Talk about spring dreaming! This card is screaming out for spring....now. Isn't it pretty? All those pretty bright yellow prints. I love it. I watched a youtube video by K.Werner today and had to copy it instantly. It was fun to make, and I used up 8 different scraps, between the rays and the butterflies and the matting. So check out her fabulous video here, and then make a spring card of your own.

This is a detail shot to show you the patterns and the glimmer mist. I used lemon zest on the butterflies and pearl on the card base.  The sentiment is from CTMH D1375 Treasures stamp set, and I used Sunny yellow and rolled the edges in Sunflower. The butterflies are from a SU! embosslit.

And here's a sneak peek at a Pazzles card I made, I will share it after we give it to the recipient. Don't want to risk ruining the surprise, but I didn't want you to think I barely touched paper this weekend. This Pazzles card turned out better then I had hoped, thanks to my mom for designing a "Super" logo for me. Thanks Mom!

Find inspiration everywhere! Go... Create something fun & fabulous. Enjoy!
 

Thursday, March 17, 2011

Clean and simple thank you card


This card really appeals to me. I really like the clean and simple, but not plain design. I saw the inspiration design on lovetostampandscrap.blogspot.com and had to recreate it for my own. I used CTMH Tulip, Sorbet and Creme brulee ink and cardstock. Now I want to make them in all color combinations. With all sorts of sentiments. Woo hoo! My brain is spinning with possibilities. I love it when this happens.

This has been a great day full of play. I took a vacation/attitude adjustment day from work. Mission accomplished. Sometimes I just need paper therapy and all my planets realign so I can go back to reality with a smile on my face.

Find inspiration everywhere! Go... Create something fun & fabulous. Enjoy!

Chipboard button card

I have had these cute coordinating chipboard buttons for forever. I picked them up from the dollar bins at Michaels and was stumped on how I wanted to use them. Until this week. I saw a card on dzignsbydiana.blogspot.com, her 03-04-11 post and I knew right away. And I was thrilled that it was buttons but it didn't say anything about "as cute as a button" for the sentiment on hers. So mine doesn't either.

This is a detail shot to show you the 5 different ribbons I used to tie through the button holes and a few I used brads through. All of the ribbon tied buttons are popped up for a little extra dimension. I used a SU! punch to punch out my little sentiment.

Find inspiration everywhere! Go... Create something fun & fabulous. Enjoy!

Scrap cards for the holidays

I don't know how I ended up with cards that look so Christmas-y. That's not what I set out to do when I was inspired by a card here, nicholeheady.typepad.com on her 03-15-11 post. The inspiration piece used craft cardstock and so I was going to also. But somehow I ended up pulling out my red paper scraps and choosing 9 different pieces. And I had handy the music notes and dictionary pages scraps left from Christmas projects. The rest is history.

This is my favorite one. I love the music notes and this was my second one so I did not attempt to hand cut the scallop bottom (ick, you will see on the next card. I did a poor job of it.) Which left me a nice little area for stamping a sentiment. Plus this was my second use of the liquid pearls, and I did not BLOB on the first flower.

On this one I do actually prefer the cotton crocheted lace, but I ran out so I had to improvise on the second card. For all the little faults I pointed out, and even though it is St. Patrick's day today, I like how these cards turned out. I will stash them away for the holidays. I'm just planning ahead, that's my story and I'm sticking to it.

Find inspiration everywhere! Go... Create something fun & fabulous. Enjoy!

Monday, March 14, 2011

Nestabilities peek-a-boo card

This darling card idea came from natureofcraftythings.blogspot.com, her 02-11-11 post. I just happened on her blog tonight, linking from one blog to another to another....until I was inspired. Voila! I just love all the creative people sharing their beautiful creations on the internet.

I used two different sizes of heart shaped nestabilities to cut the shapes in the polka dot paper. I also used  the next size up in the scallop hearts to make the border. That was harder then it is with punches, harder to line up the plain heart inside the scallop heart piece. I made about 6 or 7 of them before I was happy with the evenness of the border. Now I have lots of black cardstock hearts to use on another project. ;)

This shows the popped up polka dot layer and a little bit of the cotton candy stickles I used on the dots of the background paper. Also the white faux stitching detail around the scallop heart borders. Just little touches that dress up this cute little card.

Find inspiration everywhere! Go... Create something fun & fabulous. Enjoy!

Sunday, March 13, 2011

Urban prairie basket

I love these gorgeous spring-y colors in this paper pack, they are really inspiring me to create. This cute little basket is actually made from my Cricut .cut file version of the SU! scalloped envelope die. I designed this copy-cat version originally for the heart shaped couple card, here.
This is the side view, showing the handle better. My .cut file includes the decorative layers for all four sides too. The handle was manually border punched from the scrap that was left from the piece of 8.5 x 11 cardstock I cut the basket from originally.
Here is my first version of this basket. All loaded up for giving to a friend who's recovering from an illness.

I forgot to photograph it before I left for a visit. So these photos are taken in the car on an overcast California afternoon. But I liked the project so much I decided to come home and make another.

I am happy to share my .cut file. If you would like it, please leave me a comment on this post, including your email address and I will send it out to you.

Find inspiration everywhere! Go... Create something fun & fabulous. Enjoy!

Related Posts Plugin for WordPress, Blogger...