Monday, December 31, 2012

Loops & Threads Flamenco knit ruffle scarves


I hope you are not sick of seeing my knitting projects. I know there have been many, but I am really loving making these ruffle scarves. These two newest versions are made from Loops & Threads Flamenco yarn. It has small pom poms along the edge of the net like yarn. Very different from the other scarves I have done lately. So soft and scrumptious, and very unique looking. I really like them. These are gifts, but I will be making some for myself for certain. Soon.


A close up, to show you the pom pom edges. Not a bad pic from my phone, I think. These were knit up exactly the same as the Red Heart Sashay scarves I have posted recently, here. But the finished product is very different.

Find inspiration everywhere! Go... Create something fun & fabulous. Enjoy!

Sunday, December 23, 2012

Be merry banner


My latest holiday banner. It's a simple one since it is so last minute. The Mickey mouse silhouettes are cut on my Cricut using Mickey font cartridge and the letters are from George basic shapes cartridge. I punched holes and inserted eyelets using my Crop-o-dile and thread bakers twine through them to hang it up.


Here is a close up. Simple but cute. I had the idea to use some of these silhouettes as ornaments too, but I will probably not get that done before the holiday is over and I am taking down decorations. Oh well, the best laid plans....

If you have the desire to make one of these quick banners, I am happy to share my Design Studio .cut file with you. Leave your email address in the comments section below and I will send it out.

Find inspiration everywhere! Go... Create something fun & fabulous. Enjoy!

Friday, December 21, 2012

Knitting projects

 
I'm much too busy knitting right now for any paper projects. Above are two Red Heart Sashay ruffle scarves I made for gifts. The loom knit scarf and matching beanie hat are for me. They are knit out of Charcoal grey Homespun yarn and they are soft and yummy. I actually ended up sewing the ends of the scarf together, and turning it into an infinity scarf.


Another Sashay ruffle scarf. Sorry for the poor lighting on this one. It's really gorgeous fall colors of pumpkin, wine and a dark raspberry.
 
 
And my final Sashay scarf. Love the grey, fuchsia and pink color combination.
 
So this is what I have been keeping busy with lately. I admit I am currently addicted to knitting these scarves. If you want to learn there is a great tutorial here, on YouTube.

Find inspiration everywhere! Go... Create something fun & fabulous. Enjoy!

Monday, December 17, 2012

Pastel snowflakes card


I am usually a very traditional Christmas colors and styles kind of gal. But this year I have seen a ton of pastels and am really loving them also. So I gave it a try with this new snowflake set I picked up.
The stamp set is from Hero Arts. The ink used is CTMH Blush, Sweet Leaf, Heavenly Blue and Lilac Mist. I added some bling and some ribbon from my stash of Really Reasonable Ribbon and tied on a little tag made from a scrap left over and stamped with a SU! tiny sentiment.
Simple and sweet. I like it. I have a go-zillion snowflake stamp sets and a few more pastel color combos to try out. I can't wait.


Find inspiration everywhere! Go... Create something fun & fabulous. Enjoy!

Sunday, December 16, 2012

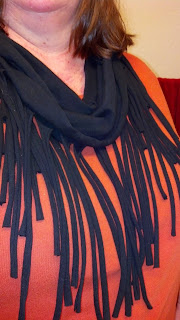
Tee's altered to fringe scarves


I have had this pin on Pinterest for quite a while. I finally took the plunge and pulled out an old tee that I never wore. Followed the easy picture instructions and created my own fringe-y infinity scarves. I like it, a lot. A lot more than the boring tee that it was before. 


So I made another. From another ugly, unworn tee. I learned some things. The black tee was a higher quality all around. Better knit, thicker. It is a better finished scarf. It has a better cowl effect and the fringe rolls up tighter and stays rolled better. The white tee was a very cheap one, thin and shapeless. The finished scarf is limp and does not lay as nice.

Both tee's were basic crew necks in XL size. I used my self healing mat and my rotary cutter. I cut off the hem and then cut right under the armpit, that left about 16 inches. So I cut my fringe in 1 inch widths and about 8 inches deep, not being overly exact at the stopping spot. After pulling all the fringe to stretch and create the rolled effect I then stretched the width also. This allows both scarves to be doubled up and still loose around the neck, also the edge rolls under so the raw edges don't really show anywhere.

Find inspiration everywhere! Go... Create something fun & fabulous. Enjoy!

Thursday, December 13, 2012

Washi tape birthday card


Here is another washi tape card. It was inspired and created just like this card posted here. I added bakers twine and some doodles of Sakura jellyroll pen and some dots of Ranger enamel accents both in black. The sentiment is from SU! and the numbers are CTMH. 

Find inspiration everywhere! Go... Create something fun & fabulous. Enjoy!

Saturday, December 8, 2012

Washi tape Disney themed card


This card, full of Washi tape goodness, was inspired by a post at kwernerdesign.com. She is currently working on a Christmas series and made a beautiful Washi tape Christmas card. You can see I went in a different direction. I had this adorable Washi tape collection from Scrapbook Expo this year, I needed to do some creating with. I added a bit of bakers twine and layered some punches and added some doodle marks. Simple and sweet I think. 


Find inspiration everywhere! Go... Create something fun & fabulous. Enjoy!

Tuesday, December 4, 2012

Altered Altoids tins and glass marble magnets


I made a few little gift sets out of altered Altoid tins filled with some decorative glass marble magnets. I used CTMH Mistletoe patterned papers to decorate the tins. With a few scraps of Authentique Christmas paper scraps wrapped around the outside edges. I had the scraps on my work area and they coordinated nicely.


The holly leaves are cut on my Cricut using the CTMH Art Philosophy cartridge. I ran the holly leaves through the Cuttlebug in an embossing folder for a little added texture, and adhered them to the tops of the boxes using foam tape and added a little CTMH Glitz in red for the berries.


The inside lid is stamped with SU! Bright Hope stamp set.


The glass beads are lined with more scraps of the Authentique Christmas papers and glued to a magnet and ready to give away.

The pieces of paper that covered the insides and out are cut at 2 x 3.5 inches. I used my Corner Chomper on the .5 inch radius to round all the corners. I then ran all the pieces side by side through my Xyron 5 inch sticker maker. I used up my stash of Altoid tins, so now I have to eat more.

Find inspiration everywhere! Go... Create something fun & fabulous. Enjoy!

Monday, December 3, 2012

Embossed Christmas cards


I made two different Christmas cards from the same embossing folder. Two very different looks.


After embossing this one was pierced from the back side with a piercing wheel on my Scor-Pal. Adding some CTMH bling in the corners and a bow and layering it on black cardstock and then a card base, it gets a generous spray of Glimmer Mist.


This one was embossed and then I used a sponge dauber to ink the high points. I added some CTMH Glitz in red and pierced the corners. It's layered up on green cardstock and a scallop boarder of Reminisce glitter paper. Another bow and Glimmer Mist finishes off this card also.


Find inspiration everywhere! Go... Create something fun & fabulous. Enjoy!

Sunday, December 2, 2012

Scrap Christmas cards


I have some new stamp sets that have been sitting on my work desk for a couple of weeks now. I also have scraps left from my last few projects and even the card bases that were left overs from my Christmas card class on November 10th. I was inspired to use all those things and make these cards. I used SU! Bright hopes stamp set for all three of these.


This close up shows the CTMH Garden Green cardstock and ink. I added little dots of Smooch accent ink in Gold Lame.


This is CTMH Lilac Mist and Sparkle and some ribbon from my stash.


This final card is CTMH Olive and again with the Smooch and the Sparkles. I hide it down here at the bottom because I went over board with the Smooch doodling, I should have stopped while I was ahead. I don't love it, but I don't want to waste it either. Not my fave, but I guess they all can't be.


Find inspiration everywhere! Go... Create something fun & fabulous. Enjoy!


Friday, November 23, 2012

Monochromatic Christmas card and another loom knitted scarf


Of course this is another Pinterest inspired beauty, and it is a crazy mash up of CTMH products and SU! stamps. The paper and the ink are CTMH as is the Color ready seam binding and the Green Glitz glitter gel. The stamps are from the SU! Bright hope set. I love them for their shwoopy goodness. They are gorgeous. I embossed around the outside edge with a SU! embossing folder also. The card front got a very healthy dose of Glimmer mist in my favorite color, Pearl.


Variation 1, just a little change to the ribbon and used CTMH Almond Glitz.

 
 Variation 2, add the red gems and sponge the CTMH color ready seam binding to match the ink.


Variation 3, ribbon change again and pearls for bling.


And another loom scarf finished. This is a navy blue and black variegated one for my oldest son. He's all pink cheeked because it is too warm to be wearing a scarf here these days. But he loves the soft texture of it and so he wears it even when he is too warm. I made it with one skein of red heart yarn and 1 skein of Caron super soft. I LOVE loom knitting. It is so relaxing for me. A cheap and easy and useful hobby. Can't beat it.

Find inspiration everywhere! Go... Create something fun & fabulous. Enjoy!
Tuesday, November 20, 2012

Masking, inking and stamping. Oh my.


I was inspired to create this monochromatic card from this card I found on Pinterest, of course. All my inspiration comes from Pinterest these days. I did not have the exact tree stamp used in the original, but I feel this is a good approximation. I really love how this turned out. 

Here are my steps to creating this card front:

I masked off a rectangle, just a little bit smaller than the tree stamp, using sticky notes.
I used a sponge and inked from the outside towards the center in CTMH Olive ink. Darker around the outside to a nearly white spot in the center. 
I inked the stamp again in CTMH Olive and stamped it off on a piece of scratch paper so that I could second hand stamp it inside the masked area. 
I removed the sticky note, masking pieces. Stamped one tree image going outside the edges of the rectangle. 
Stamped the sentiment and then sprayed the entire piece with Glimmer mist in Pearl and then sprayed with Goosebumps spray also. I was going for a snow effect. I also added some Liquid pearls in Ruby red. 


I liked the finished product so much, I made another. Similar but not the same, loosely inspired by this card. Sticking with the monochromatic theme and the exact same steps as before. I switched to CTMH Lilac mist ink and paper color, and used my brand new SU! Snowflake Soiree stamp set. Adding dots of Liquid pearls in Baby blue.

Find inspiration everywhere! Go... Create something fun & fabulous. Enjoy!
Related Posts Plugin for WordPress, Blogger...